Tuesday, August 31, 2010

Behind the Sketch: The Four Stage Process

STEP ONE: The Freehand Rough Done on Xerox Paper

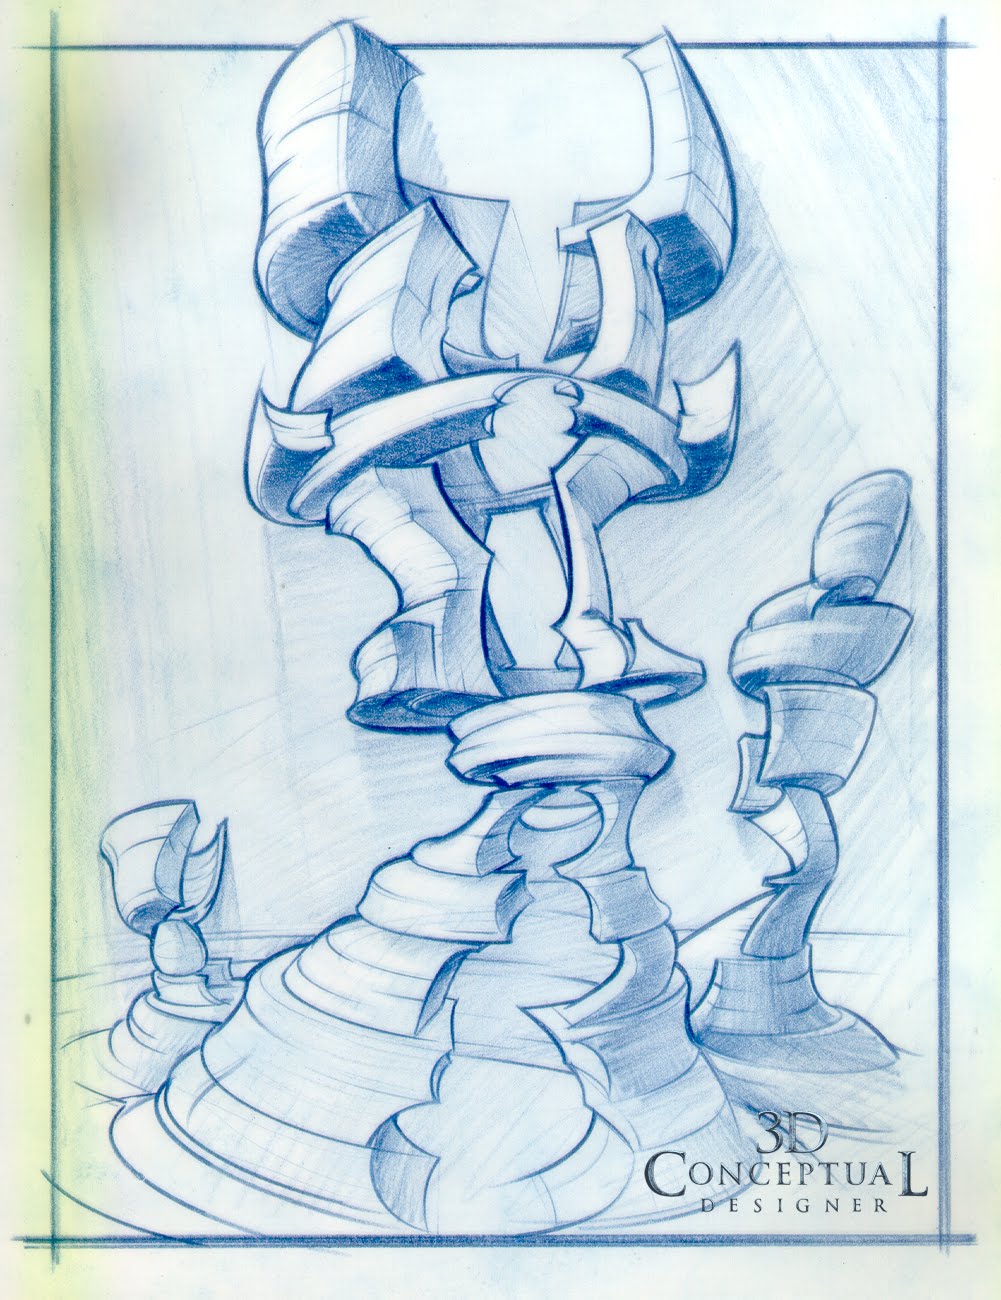
STEP TWO: Clean Up on Velum using French and Ship Curves.

Step Three: Remove all color and stage in Photoshop CS4 with light and shadow.

Stage Four: Final colorized with filters for a painted look and textures added


Behind The Sketch: The Four Step Process

I am asked if I like sketching in the computer all the time, and the fact is that I am a traditional sketch artist trained during the time at Art Center when the Students only sketched on paper. I have a process that I have used for a few years and here is a basic breakdown.

The above sketch was done for Rand Miller up in Spokane WA back in the year 2000 when I was doing Conceptual Designs for the URU extension of the MYST worlds.[ What a FUN time that was!]

Supplies:
Indigo Blue Color-erase.
Indigo Blue Prismacolor.
Indigo Blue Markers.
8.5 x 11 Plain white Xerox Paper
8.5 x 11 Clear-print Drafting Velum.
Alvin Drafting Dots.

First Step:
I do a very rough freehand sketch blocking out the shapes and the basic proportions that will be in the design. I do this with a Colorerase Indigo Blue pencil on plain Xerox white paper. I have loved the Indigo Blue sketch technique since it was taught to us at Art Center but then we used Verithin and Prizmacolor. I now use color-erase, since it will actually erase well and I tend to push so hard I break the fragile leads in the Verithin pencils, and can "put an eye out".

Second Step:
I overlay the rough sketch with Velum using drafting dots on the back so I can slide the curves over the drawing and NOT catch the tape. I do this tight version over the top using french curves and ship curves so the majority of the sketch is done with templates, another technique that I have used since I saw Syd Mead paint using curves back in his studio in the mid eighties, I applied it to drawing. I then scan the image at a very High resolution as a 4K JPG.

Third Step:
I desaturate the image in Photoshop CS4 to remove the color and I stage the image with lighter and darker layers of the sketch and I paint between them to achieve a better staging with light ans shadows accentuated. Working in black and white allows you to see the value contrast better and not be distracted by color similar to B+W Photography.

Fourth Step:
I colorize the image into a family of color of choice, and as in the above case I also added a texture to the image as well.

Cheers, THOM

Monday, August 30, 2010

Project Review: Neurocomp Systems Pulsar. 2007

The overall product in the cart as a FRONT VIEW.
The Pulsar system in the cart as a 3/4 Rendering.
The Pulsar Box front view Product Correct.
The Pulsar Box Back view showing all inputs.


The Pulsar Box 3/4 view.


NeuroComp Systems Pulsar Medical Device.

Client: Neurocomp Systems via The Cimarron Group.
Art Director: Myself for Dr. James P. O’Halloran.
Project Date: Fall 2006

While running the design division at Cimarron I brought in a Medical Device client for them that was developing a Neurological Electronic Machine that needed to be 3D Illustrated for the website and for promotional work for the product. I spent about a week or so building all components for the system including the cart and laptop that go with it and the Renders were done at high resolution for poster printing as well.

Cheers, THOM

Friday, August 27, 2010

Project Review: Race to Atlantis PART V

After diving into the city we are flying past these Huge Mushroom buildings.

We approach a gate of sorts made of stone.

We watch the other racers pass through it.

Then we ourselves[ The rider] pass through it too.

Sparks fly as a Flying Chariot hits the wall.

RACE TO ATLANTIS PART V

Client: Rhythm and Hues.
Art Director: na.
Project Date Summer 1996.

In this fifth post on my work on the 3D ride-film storyboards for the Atlantis Ride Film at Rhythm and Hues, we are now in the floating city we just dove into. The buildings are huge floating "Mushroom shaped buildings floating in the sky that we are racing around. We will fly through a gateway and head up to the Pyramid near the end of this portion. This is an ongoing series and will get the rest of the story shorty.

You can view PART I here

You can view PART II here

You can view PART III here

You can view PART IV here


Part VI Coming shorty.

Cheers, THOM

Thursday, August 26, 2010

Project Review: The Core 2003

The Finished Poster with the 3D Illustrated Earth a 6K render.

A concept for the Earth with a translucent core seeing the fire inside glowing superimposed over the globe above for a Lenticular concept.


The digger named "Virgil" headed towards the Core!

Virgil headed right at us!

I created a 3D version of the Icon for an ancient symbol used in the film.

A fun concept for a floor mounted Advertisement you walk over in Theaters.

A concept 3D Illustration of the Pilots mask reflecting the Earths Core in the face shield.


THE CORE

Client: Paramount Pictures via BLT and Associates. Art Director(s): Ronnie Blumenberg,Josiah Ludivico, Jeff Barnett. Project Date: January 2002-January 2003.

For the file The Core I was tasked with helping to create some 3D Illustrations for Posters that would be Iconic Images from the film. I built "Virgil" the drilling vehicle that is found in most of the film, but I was lucky enough to get the actual CGI prop model from the film so I was able to use the actual model for the final artwork. What ended up finishing was merely a 3D render of the Earth that we split in two, but I did far more concepts that didn't see the light of day. A very fun project that was on and off for over a year.

Cheers, THOM

Wednesday, August 25, 2010

Project Review: Silvestri California Catalog Sketches 1992 PART III

Crazy Shirts- Custom Hat Stands.


Warner Brothers Store-Custom Mannequins with clip racks.

Warner Brothers Store-Custom Hat Racks.

Warner Brothers Store-Custom Clothes Racks.

Custom Foam Arm Upper body shirt stands from The Broadway Collection.

A decoration Item from J.C..Penny, a birdhouse stand.


Project Review:Silvestri California Alternate Catalog pages 92' PART III

Client: Silvestri California.
Art Director: Bill Daniels.
Project Date Fall 1992

In this third part in my Silvestri California Catalog work, I did some alternate pages for vendor specific needs, and the Warner Brothers stores had an account with Silvestri California to build not just he custom Character Figures but all custom fixtures so above you will find a few pages from the WB stores as well as a few extra pages for JC Penny and The Broadway.

Cheers, THOM

Tuesday, August 24, 2010

Project Review: Rules of Attraction

A snake Syringe done for Art Director Alon Amir.


The Combo-Lock Chastity Belt modified to fit a Model shot.

A female torso hidden in the apple core.
The Chastity Belt Icon.

A "Mail Slot and a Screw" any questions?


Rules of Attraction 2002

Client: Lion Gate Films via BLT and Associates. Art Director(s): Alon Amir, Zack Ris, Marcus Almaraz Project Date: Summer 2002

Back when I was doing 3D Design at BLT and Associates in 2002, I did some fun little items for concepts for the new file The Rules of Attraction. No logos this time but some 3D Illustrations. The film was marketed as a sexy Dramedy[ Drama-Comedy] so lots of risque' ideas were in order and a Chastity Belt with a Combo lock! FUN.

Cheers, THOM

Monday, August 23, 2010

Phantom 2040: Project Review PART XXIII

In 2040 the designs were organic so way back in 2015 they were still blocky designs to set them off from the modern ones.

A Hyper Limo that went to outer space for Sean one.

A rescue Air Transport ship[ RED CROSS].

Grafts Military Spec Scram-jet.

A War era[ Grafts War]Armored transport up on blocks.

A 2015 Battle Tank[ blocky styled].


The Phantom 2040
PART XXIII
Vehicles from season 2

Client: Hearst Animation Productions.
Art Director: Myself.
Project Date: Late 1994.

When Art Directing The Phantom 2040 series for television, I designed all vehicles for the show, both the main character vehicles, and all secondary ones. Above are a sample of the range I needed for some Past future tech, since it was 1993 at the time I designed these, and the show was taking place in the year 2040, I had to go back to 2015 for some "blocky" designs from the past for the show, but the future for us.FUN!

Cheers, THOM

Friday, August 20, 2010

Project Review: Piranha 3D PART I

A pound of flesh Logo done for Rob Russell.

A Logo being devoured by the Piranha done for Art Director Chris A. Hawkins.

Here they come! Logo designed for Chris A. Hawkins.

An early concept for a Logo being feed upon for Art Director Chris A. Hawkins.

A Logo sitting in the water done for Art Director Brian Lauzon.

A second concept on a Logo in water done for Art Director Brian Lauzon.

A fun Logo with "teeth" done for Art Director Brian Lauzon.

The X-Rayed Fish Logo done for Art Director Brian Lauzon.

An alternate version of the above X-Ray Logo.

The typical layered metal logo as seen in Tomb Raider.

A BIG Logo done for Art Director Brian Lauzon.


PIRANHA 3D
PART I

Client:Dimension Films via The Cimarron Group.  
Art Director(s): Brian Lauzon, Chris A. Hawkins, Rob Russell.  
Project Date: Fall and Winter 2009.

I began doing Logos for the new Piranha 3D remake while I was finishing up my contract at The Cimarron Group, and the work continued as I now design from my own studio. Brian Lauzon did a good portion of the work and this was one of the first jobs we worked together on while at Cimarron. Pre-Historic fish and bikinis are the soup of the day for Piranha and designing a campy fun logo was a great experience. I also did a school of 3D fish for comps as well as the CGI was not finished at the time the Posters were being designed so I did 3D Illustration as well as mostly Logos. FUN!

Cheers, THOM

You can click the post title to go see the trailer[bloody and sexy!] or you can paste this text into your browser too:
http://piranha-3d.com/

Thursday, August 19, 2010

Project Review: Race To Atlantis PART IV

After getting hit it spins up to follow the racers.

We are now following along and IN the Race!

A Large Buttress hits us and bumps the riders.

We get hit again only HARDER!

We lunge over some Architecture and dive down.
[ To Be Continued...]


RACE TO ATLANTIS

PART IV

Client: Rhythm and Hues.
Art Director: na.
Project Date Summer 1996.

In this fourth post on my work on the 3D ride-film storyboards for the Atlantis Ride Film at Rhythm and Hues, we are now fully in the race receiving instructions from the ever present comic relief in the flying machine that keeps bumping us. We also are interacting with the scene getting bumped around too. Look for the next Storyboard post coming soon.

You can view PART I here

You can view PART II here

You can view PART III here


Part V Coming soon.

Cheers, THOM